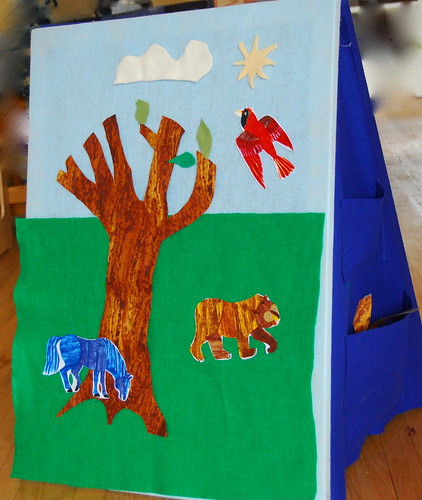
I created this felt-board especially for the 'Adventures with Mimi' nature class. This felt-board pattern stands on its own, is lightweight, collapsable and has pockets on the side to store your objects. Make one side with light blue felt for daytime scenes and the other side with dark blue felt for nighttime scenes. You can make a custom felt board with whatever shapes you can dream up. Quilters cotton, fleece, and wool, sticks right to the felt without velcro. You can cut the shapes out from solid fabrics or buy printed fabric with pictures to cut out. I bought a yard of Eric Carle's 'Brown Bear, Brown Bear' fabric and cut out all the different animals. I made leaves for trees out of wool sweater scraps.
What you need:
- 4 26" canvas stretchers
- 4 32" canvas stretchers
- Staples and heavy duty staple gun
- scissors
- 2 yards of felt (1 yard in light blue 1 yard in dark blue)
- 2 2" long hinges and screws (need a screw-driver to attach hinges)
- Thread to match the felt and a sewing machine
- 2 yards lightweight fusible interfacing
- Assemble your stretchers so that you have two 26" by 34".
- Cut the felt so that you have about 1.5" extra all around.
- Use you heavy duty staple gun and staple the felt around the stretcher, like you would a canvas. Start in the middle of the bars, going around, end with the corners. The felt should be taught and even all around.
- Attach the hinges on the back side of the stretched felt boards, across the 26" side.

- Cut two triangles 23" across the bottom and 36" tall. Cut straight across the tops of the triangles 2" down so they have flat tops.
- Cut Pockets: 2 6"X6" 2 11"X9"
- Sew pockets onto side triangles, one big and one little onto each side
 .
. - Staple side triangles to the backside of the felt boards. This part is a bit tricky, pinning first may help. Use something to prop up the felt board while it is on its side. Staple as close to the edge as possible, with staples about 1" apart.

- Use your imagination and make objects to stick onto the board. You can use the them to tell a story or children can make up their own.
- If you are using quilters' cottons, you can iron-on lightweight interfacing onto the back to give the fabric more support and prevent fraying.